Wednesday, December 25, 2019

Altezza Diary 2 - Top Secret

It is very important to get a full check-up when purchasing a used car, especially if it is a performance car. During the check-up, it is possible to have a clear picture of the current condition and what is needed to be done to restore the car. When I first bought the Nissan Fairlady Z, I took it to a workshop that was renowned in all things Fairlady. This time was no exception and that is why I took my Toyota Altezza to Top Secret Performance workshop. I have known the owner of Top Secret since my Toyota Celica days. He currently owns 2 Toyota Altezzas and has experience working on various Toyota models. If I am looking for an expert in Altezzas, then he is the guy to see. I already had a list of things to do before visiting the workshop and I arrived even before it was opened. 


The first thing that needs to be done is to return the car height to its original, factory setting. I have never liked lowered cars because of the many speed bumps and basement parking in Malaysia. It makes it an inconvenience to drive and there was also the problem of something scrapping when turning the steering wheel all the way to one side. My Altezza is currently equipped with a D2 Coilover set that has height and dampening adjustability. So, it is possible to lower and in this case, increase the height of the car. When the wheels were removed, I took the chance to examine the rims to see if there is any evidence that the rims were scrapping with something when I do U-turns. I found scratch marks on the inner lip of the front, left rim and also on the anti-roll bar. Clearly, when fully turned left, the rim comes in contact with the bar and scraps during U-turns. I told the mechanic in charge but it did not seem to be of importance to him. After around 20 minutes, the height was adjusted and it looks much better in my opinion. I do not have to worry about going over bumps or parking at underground parking. 


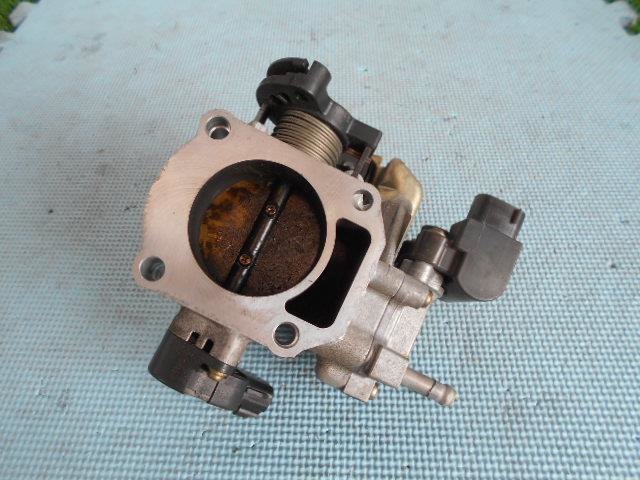
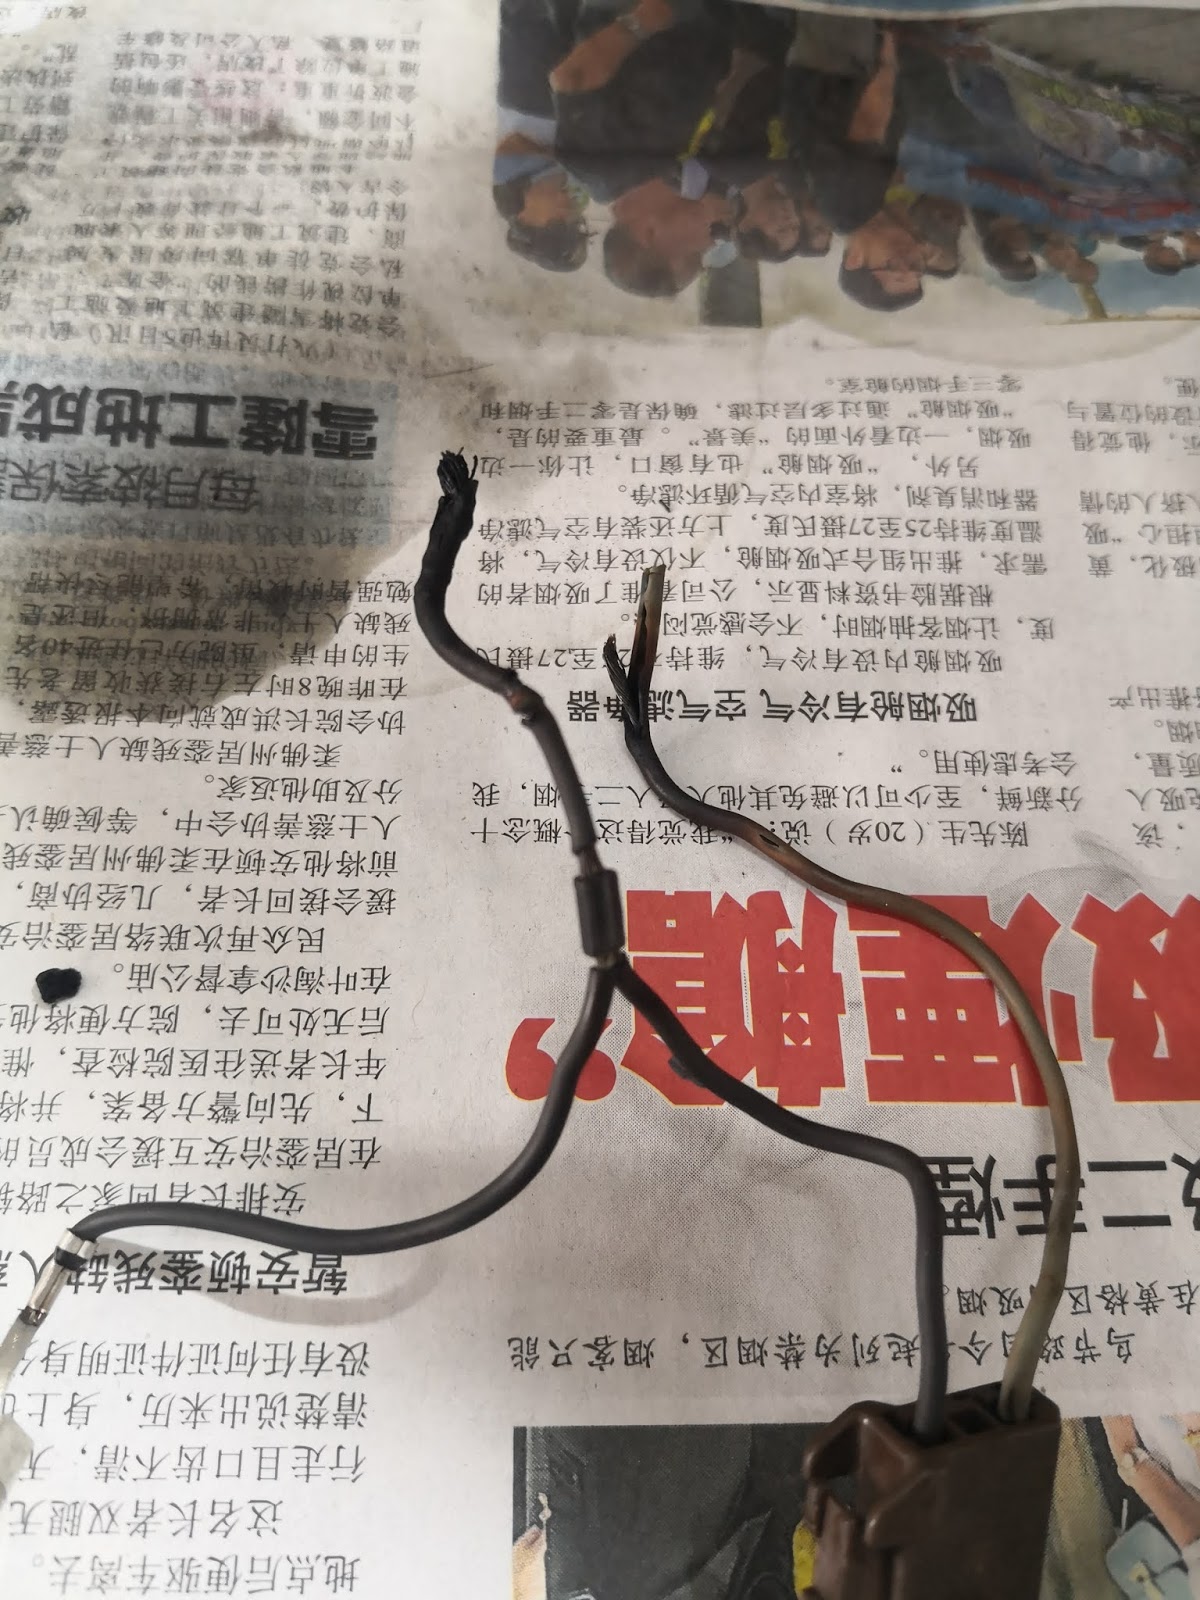
Next, the car was prepped for regular engine service. It is always a good idea to service the engine because there is usually, no service record provided by the previous owner. It serves as a fresh start to new ownership and avoids facing failures in the short term. Top Secret recommends HKS engine oil from Japan and from the label, it is quite the premium, sports engine oil. I also had them looked at another issue that I was facing. Whenever I start the engine, the ignition needs to crank the engine for a long time before the engine could start. The first thing that was checked was the spark plugs. The spark plug looks old but not worn out. I asked to change the plugs since it was already removed. They tried to start the car after both were done but the problem still persisted. They suspected the fuel system next and immediately thought to check the fuel filter. It was troublesome to remove the filter as the rear seats had to be first removed. The fuel filter was very dirty and from the looks of it, it is the original filter from 20 years ago. Luckily, one was available and could be changed right away. They also found out that although the fuel pump is still working, there was one wire that was opened and that could cause an explosion. They found a used plug lying around and immediately changed for me. 


All the hard work paid off when the engine started after only a short crank. The problem could be caused by insufficient fuel supply during ignition. The filter might have been blocked and only little fuel could pass through. This also explains why there was a lag during acceleration after speed bumps and why the engine would stall easily. The owner took me for a test drive and told me the engine is healthy and power is great. He did a U-turn but unfortunately, the scrapping sound is still there. This meant that the scrapping was not caused by the lowered height of the car and I was disappointed but determined to find the cause. Overall, I was happy with Top Secret and am glad to solve some issues with the car. I felt the car drives much better now. There are still some things to be done to the Altezza but I will do it one by one. 

Friday, November 29, 2019

Altezza Diary 1 - Accessories

After driving for a few days, it came to me that it is difficult to survive without a few essential upgrades to the Toyota Altezza. The first difficulty is when reversing because this Altezza does not have reverse sensors nor a reverse camera. I do not wish to drill holes on the rear bumper and the alternative is to install a reverse camera. In order to do so, I would need a touch screen that could transmit the live feed. Unfortunately, there was no touch screen but instead has an old fashioned head unit. However, the biggest flaw, in my opinion, is the lack of an alarm system. This might be a 20 year old car but I am still worried about the Altezza getting stolen. These 3 things that need upgrading would cost a bomb but the silver lining on this dark cloud is that all 3 could be done in the same place. It is also very essential to improve my driving experience. I was in luck because there is an accessories shop, named Superstar, near my office. I have been there previously with my Nissan Fairlady Z and both the price and workmanship were good. The best part is I could drop the car and continue going to work. I usually collect my car when I finish work.


The accessories shop's salesperson was very happy when he heard of the list of things that had to be done. I knew it was going to cost me a sum and would take the whole day to finish. I dropped my car got during lunchtime and I figured by the time I finished work, it would be done. The first thing on the list was to install the reverse camera. Installing at the preferred location is a small matter but the wiring has to go from the rear and connect to the touch screen all the way in the front. Next, the whole center console has to be removed to remove the original head unit and install the new touch screen. I chose a 7-inch screen from China which was mid-quality to keep the cost down and it has all the modern functions such as Bluetooth, AUX and USB connectivity. I also had a new alarm system installed with a brake locking mechanism. The way it functions is when the brake pedal is pressed, all doors will be locked. Since it has to do with lock, all 4 door panels had to be removed. Although the changes were minor visually, the touch screen does give the car a breath of fresh air and with the reverse camera, makes my life much easier when driving the Altezza. 


There were some extra issues I had the shop help fixed. The Altezza was a cyclops at night because only one headlight was working and it had a green bulb. Initially, I only wanted to get new bulbs for the main low beam but it seems that the smaller bulbs were also out. The shop recommends HID white bulbs for the main bulb and the result is fantastic. Next, was the driver's window switch which was hard to press. At times it feels stuck and requires additional force to wind the window down, to the point I was afraid I might break it. So, I ordered a used unit for replacement and was surprised, it was not expensive. The installation was free of charge. The last thing I had done was reinstalling the left side skirt. Although the skirt did not fall out and the screws were still intact, there was a gap between the body and skirt. I could see there are some blobs of silicone glue, which the previous owner might have used to hold the skirt in place. The shop removed the silicone glue and cleaned the surface of the body and skirt. Next, 3M double-sided tape was laid on the edge of the skirt and the skirt was put in place. I think many did not know this industry secret but most side skirts were held on with just tape. Even skirts from the factory in Japan use this technique but usually, there were extra pins. 

HID Bulb Ballast


It took a whole day to get everything done and it cost a bomb. However, I think these upgrades were important and necessary. The car might be 20 years old but at least it does not feel old right now. 


Wednesday, November 27, 2019

My Impression

Modern cars are now tuned to have great drivability in the city where engines have more torque than power. Older, Japanese sports cars like my previous Toyota Celica had a different recipe. For example, my 2005, Celica had an impressive 190 hp but only 180 Nm of torque from a 1.8 liter engine. When you compare that to my 2013, Mazda 6, it has a lesser, 184 hp but a good, 250 Nm of torque out of a larger, 2.5 liter engine. My next car, the Nissan Fairlady Z, had high power and high torque from a very large engine. When I compiled my experiences, it brings forward an expectation for the Toyota Altezza. On one hand, I knew the engine would be similar to the Celica by having a high power but low torque. However, it is rear wheel driven and is promising to drive, much like the Fairlady Z. I told myself, this would be an educational but fun experience for me. I have always wanted to drive an Altezza and already knew its specification but we all know, the actual driving experience will not be the same as reading the details.


2ZZ-GE (Celica) vs 3S-GE (Altezza)
Skyactiv-G 2.5 (Mazda 6)
I had to experience how the Altezza would perform and so, on the same night I got my Altezza, I went to a highway behind my house with my friend. This was my usual spot to test cars because the highway is 3 lanes wide and usually empty with a long stretch. Usually, I would pay the road toll and exit with 1st gear, driving hard, all the way to the redline. The Altezza accelerated well and frankly, quite easy to handle but the wait for the rev to hit redline at 7800 rpm, was honestly, too long. I felt like I waited a long time before I had to shift gears. Immediately, it felt slower than my Fairlady Z, which was obvious but reminds me a little of my time driving the Celica. However, there was a serious flaw about the Altezza and that was the suspension. While I was sprinting and almost reaching the speed of 170 km/h, the car was very jumpy, an indication of a setup that is too stiff. There was no way I felt confident to continue. This test gave me a clear picture of how the 2 liter, 3S-GE engine works. It is definitely slow by modern standards because torque picks up only starts around 3000 rpm while modern cars provide instant torque.


In the city, the Altezza continues to feel underwhelmed compared to modern cars. Once when I was going over a bump, there was a hatchback, side by side with me and after crossing the bump, I accelerated. Despite my acceleration, the hatchback had already pulled far away from me. Although the Altezza was supposed to be a sports car and had a loud exhaust note, there was a 5 seconds throttle lag. This had something to do with a throttle body design that was neither wire pulled nor electronically pulled. It had a semi-electric throttle body, which in my opinion, was an experimental design. In layman terms, the input from acceleration is the same as modern, electronic throttle but the movement of the throttle flap was done mechanically, like a traditional throttle body. Meanwhile, the stiff suspension setting continues to be a problem in the city. There is the need to go very slow over speed bumps and on any road with a bend that needs cornering, the car becomes very unstable. Another issue was during left U-turns, where there is a sound of metal scrapping. The suspension desperately needs adjustments.

Uses Positioning Sensor from Accelerator and Motor to pull the cable
Having written the above downsides of the car, The Altezza is not without its advantage. When compared to the car I replaced, the Fairlady Z, it is a much accessible car. It is much more convenient to be a daily ride because it is a sedan with extra seats and a large boot. If comparing power and torque, the Altezza is like walking a mid-sized dog that follows the direction that you lead while the Fairlady Z feels like a big German Shepherd running around enthusiastically, pulling you and you need to control it. Gear shifting is very smooth and engaging, and I dare say it has a better feeling. It does not make you feel stressed when driving around the city. Furthermore, the soundproofing of Altezza is done very well. The loud exhaust does not intrude into the interior and I could talk without needing to shout. The fact that it has doors with frame helps keep the noise out, unlike sports coupes. Overall, an Altezza is a very nice car to drive around daily. It could be a comfortable car most of the time and it could be a quick, fun machine when needed. However, my Altezza does not give a sense of confidence to its driver and it desperately needs a suspension tuning. There are also many things that need a bit of love.


D2 Hi/Lo Soft/Hard Adjustable Suspension

Saturday, October 26, 2019

Swapped

The day I viewed the third Toyota Altezza was a Thursday. At first, I thought I could not proceed with the swap the next day because there are things to prepare beforehand. The soonest I could swap would be another day later but the land authority office would be closed on a Saturday. I told my buddy of the dilemma and he told me I could do it at night and on Saturdays because, in Malaysia, we have special centers where several government offices operate until night time. I wonder how I could forget about the centers and that was why, I thought I must do it on a weekday. I should not delay anymore as the owner might back out of the deal. So, I quickly contacted the Altezza's owner and told him my plan to do it that same night. Both of us made arrangements for our respective cars to send for inspection and I applied for car insurance. The whole day I was excited and could not concentrate on work. It was finally happening and although it is not a faster car, I was looking forward to the experience with the Altezza. When I had my Toyota Celica, I wanted to have an Altezza. That way I could have a sports coupe and a sports sedan for every occasion. It is kind of a dream come true to experience how an Altezza would drive.

Everything was in a rush. I had to arrange for a runner to send my Nissan Fairlady Z for an inspection and then purchase new insurance coverage for the Toyota Altezza. Both these tasks had to be completed before the end of the day's working hours, in order to make it in time for transfer of ownership to take place on the same night. It was a relieve when both tasks were done before 6 pm and I was able to go to the special center, straight after work. Aside from the queue, the whole process only took around 15 minutes. After the transfer, I renewed the road tax for the Altezza but the new owner did not renew for the 350Z. It was understandable because the cost of 350Z's road tax could renew more than 10 years for the Altezza. The next thing to do was to bid my 350Z goodbye and transferred all my items to the Altezza. I briefed the new owner certain quirks about the 350Z and he left. I had to meet my friends and this would be a good test drive for me. The first issue I had with the car was the headlights because one was green and one was not working well. The second thing happened when I turn the steering wheel fully left and tried to drive. There was a scraping sound and I remembered that this car was lowered and maybe the tire is scratching the fender. I also had to pump petrol for the first time.


Overall the drive requires some getting used to. I noticed several issues but I was not sure whether if it is a characteristic of the Altezza or something is not right with the car. There's only one way to find out and that is to drive more and bring the Altezza to a workshop for a full check.

Monday, October 14, 2019

3rd Time was the charm

After a disappointing end with the previous viewing of the turbocharged Toyota Altezza, I had one appointment left. I was getting desperate and depressed. Nevertheless, I went ahead to make an appointment with the owner to meet up. I asked to meet at a local Tesco to view the car and this time, I bought my friend as well. I told my friend that if this 3rd viewing does not go well, I would need another plan. The Altezza owner was late to our meetup but when he arrived, he came with his crew of 3 more persons. His friends arrived in a first-generation Lexus LS460 and it was modded. As soon as he arrived, all 4 of them looked at my Nissan Fairlady Z. One was looking at the boot, another at the interior and another 2 at my engine bay. I was surprised because each of them was asking me a lot of questions regarding my 350Z and the questions were very professional. I knew these guys were either mechanics or real enthusiasts. I made sure to inform them that my car was in good condition and comes with a lot of goodies. The only fault was the fading paint. I could tell the Altezza owner was very interested and in his mind, he might think that I was such a fool to want to swap with his sedan. After around 45 minutes (longest view ever), it was my turn to look at his Altezza.


The owner started the engine and the first thing I noticed was the loud exhaust. The engine bay was clean and stock with no modification. The idling was stable and there was no weird sound. I looked around the exterior and, to be honest, it looks so much better than my 350Z. The paint must be either newly painted or well taken care of as I could tell it was polished. I found out later the owner works in a paint shop. The Altezza had the Neo Sports body kit from the factory and that is exactly what I was looking for. If I had to pick a fault, it would be the white, Advan RGII rims that were not my preferred design and its color is too much of a contrast to the black paint. Inside, everything was stock and very well preserved. The only thing out of the ordinary was the re-wrapped steering wheel and carpets. Both these were red and black colors, bringing some contrast and sporty feel to the interior. The car as a whole is a beauty to me because of its pristine condition. It is not in perfect condition but this is close. Next, I drove this Altezza around the carpark of Tesco with one of his friend in the passenger seat and vice versa. I was glad I asked my friend along.


When we were done with the test drive, we exchanged feedback. The clutch was a bit weird as it was hard to balance but the drive was pleasant. I did notice sometimes the pedal would not bounce back after being depressed. I was ready to make a deal with him to swap my 350Z with his Altezza. The condition of the Altezza was in good shape to me and I was willing to swap without the need for a top-up from him. I could just swap, drive with no issue and not need to spend a large sum to restore like I did with my 350Z. However, I did mention about the pedal should be checked. It could be a lack of clutch oil or the clutch pump was dying. The night ended with me shaking the owner's hand and agreeing to the swap. I told him that he needed to check the clutch and I could only proceed with the change of ownership next week. So, we shall wait for that but I am excited that I will be changing a new car.


Tuesday, October 1, 2019

Old Lady to Young Lady Part 13

Seeing that I am about to sell my Nissan Fairlady Z, I figured I should do a final restore that has been annoying me for some time. At the beginning of my ownership, I noticed the plastic cover on the driver's side of the rear bonnet that was always hanging. Once I thought it was loose, I just gave it a hit and it was ok. After a while, it was hanging again but the previous trick does not cut it anymore. One day while I was walking from the rear, I realized that it was not just the cover but my third brake light was also hanging. Another thing to restore was the dampers that support the boot while it is opened. I tried to find a replacement in the past but due to the high price, I did not proceed. The price for a pair of new boot dampers usually goes for around RM 400 but after 2 years, I found someone selling a pair of used dampers for only almost half the price. I decided to go ahead at the same because both are from the same section of the car, the rear. I went to buy the used dampers and I was excited that the dampers still has some strength to it. I need the boot to stay open in order to check and repair the hanging third brake light and plastic cover. So, the first step was to replace the boot dampers.
Pic Left: Using Wood to Hold, Pic Right: Used vs Original (spoilt)


The steps are easy and only simple tools were needed as I have removed the dampers before. I only had a problem attaching on the boot side because it was not easy to get the right height. The wood I used to hold up the boot was not long enough and so, I had to get help. When it was done, I thought the damper could hold the boot on its own but I was wrong. It was at that moment, I realized why it only cost almost half of a new pair. The answer was because the strength it had was only half of what it should have. I guess it could have supported the boot but the extra weight of the spoiler made it difficult. I did feel a difference with this used dampers though. It only requires half the energy to open the boot now. I still need the wood to hold the boot in place though to move to my next restore. I started to remove the plastic cover and saw that the third brake light was attached to another cover with screws. I opened the second cover and found out my third brake light was broken and that was why it was hanging.

Second Cover with light hanging. 


I checked the first plastic cover and was relieved that although some of the plastic was broken, all the clips were still there. This meant I can attached the cover properly. The second cover was also removed to access the third brake light. There is a part that was tightened onto the boot that broke off from the body. I removed the body of the light and the broken bit. Then, I found some super glue and stuck them together. I thought I saved a lot by DIY-ing but when I attached the repaired third brake light, it could not hold well. The second cover had to be attached to the light, while the light has to be screwed onto the boot. So, the heavy second cover was pulling the light down and the glue could not hold properly. It was a failure but I put everything together and covered with the first cover. The first cover supported both the second cover and light, relieving the stress on the light. I was able to cover everything nicely and I need to test my work. I drove around a couple of days and the cover never fell again. I might not have fixed the third brake light properly but the whole thing turned out well. I am happy.
After Glue
After Glue
Attached without cover flawlessly